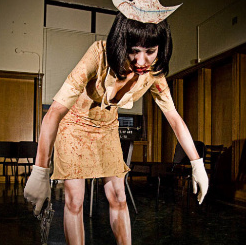
This tutorial is a kind of guideline as to how I created my Demon Nurse Silent Hill Costume. Obviously things in this tutorial can be played with or changed around a bit so that you get your favored results from the costume. Also, the way the dress is fashioned in the pictures is to simulate the Nurses in Silent Hill 3. Nurses in the movie and in the 2nd, Origins and Homecoming games may have differing patterns of dress.
A shout out to Anon for pointing out some details I missed on the dress.
*All images can be enlarged for a better inspection! Just click on them!
Here are the materials you will need:
- White Fabric; About three yards, preferably something mostly cotton.
- A box of teabags (Cheaper the better for budget)
- A nurse dress pattern (I choose one from Simplicity)
- Scissors for the cutting
- Pins for the pinning
- A big plastic tub (if you don’t want to accidentally tea-stain something around your bathtub)
- A BIG SPOON
- A dark brown acrylic paint, a red acrylic paint and a black acrylic paint
- A few throw-away cups to put paint in
- Paint brush
Other Stuff you might need:
- Comfy off white shoes (I choose ones with a bit of heel, since the nurses legs are so defined)
- Sandpaper
- Extremely tough interfacing
- This Nurse Hat Pattern
- Blue Sharpie
Step One: Choosing a Pattern/Getting it Ready
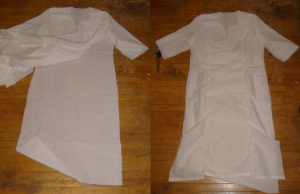 Start off with a pattern of your choosing. I choose Simplicy Pattern 4470 because it looked comfortable and easy to edit to what I wanted. All I had to do was put a zipper in the side of the dress and connect the front two panels into one panel without a zipper since I put it on the side. Also, later I had to draft my own collar because the patterns collar was to small and not the same style. I also had to add cuffs and a belt, but these were easy to do because I just cut fabric to the same size as the bottom of the sleeves and measured my waist to make a belt. Pictured above is how I started my pattern, I didn’t sew the sides at first because I wanted to put the zipper in AND because I noticed that the cuffs, belt and collar all had a bit lighter of a stain then the rest of the dress so I decided to add these items afterwards with less tea to stain then so there would be a difference in color like in the game.
There is a number of different patterns you could use, just choose wisely as to what your skill level is. I choose a pattern that would use more fabric because I find it easier to cut back on what the pattern gives you then to add to it. With this pattern I had longer sleeves and a longer skirt that I could cut to my liking. It also had a shorter neckline that I could cut to reveal more nursey clevage, but I could also make it less showy if I didn’t feel like exposing myself to the world. *Remember, most Silent Hill nurses don’t have pockets on their costumes. This is a mistake I made with my first Demon Nurse costume when picking out a dress. HOWEVER! You can always take the pockets off with a handy-dandy seam ripper. But do this before you stain it because it will show where the pockets were before hand if you don’t take the pockets off before staining.
Step Two: TEA STAINING!
I used this tutorial with my own flairs here and there.
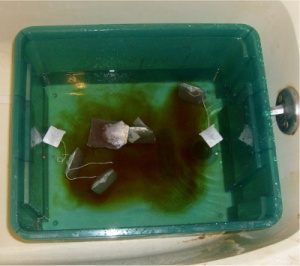 First I found a plastic tub to do all my staining in. I wanted to do this so that I didn’t stain any of the things in my bathtub that I used to keep me from slipping when I took a shower. Also, I didn’t want to possibly stain anything else around the shower like a curtain or towel. Having it in a tube controlled the area I kept it in, plus it made for a great place to catch any drips when I hung the dress up to dry.
I put in it in the bathtub at first to fill it with as hot a water as could come out of the spout. I used 5 or 6 teabags and left them in the water to drain out a bit while I got the dress ready to put into the tub. I then stirred it, just like I was making kool-aid or something until the color was a nice dark brown then added one or two more tea bags.
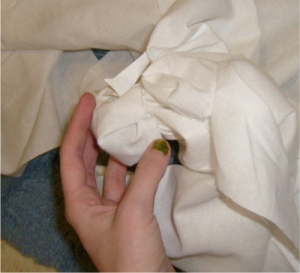 Next I readied the dress. In order to get stained spots onto my dress I decided I needed to do something like tye-dying. I put teabags, with little slits in them, into the fabric and used the string from the teabag to tie them into place. This is similiar to what you do with tye-dying, except with different colors and rubber bands. In the future I may use rubber bands more in the dress to get a more varied effect. If you feel like experiementing and would like to send me how the dress looks this way, I would love to post it! Just PM me on Cosplay.com.
I did this little tea-bag tying thing in 6 locations randomly around the dress. You don’t want to make it symmetirical because not much in Silent Hill is really that symetirical.
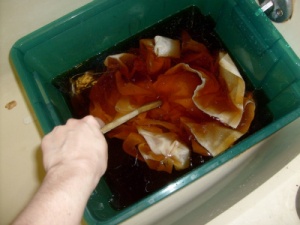 Next I put the whole dress, with the tea bags still in the water and in the dress into the tub. I kept the big spoon handy so that I could stir it and I went downstairs to watch True Blood. Of course you can watch whatever you wanna watch when making your nurse dress, althought I totally recommend something gorey, because you’ll want to be in that mindset when you are finishing your dress.
Every once in a while you will want to stir the dress and make sure parts of it are being submerged underwater enought that you don’t have parts sticking out and staying white. I kept my dress in for about 3 hours while watching my show and taking breaks about every half hour to stir the dress. I also would use the spoon to kinda push on the teabags I had tied into the dress so that they would let out a bit more tea around the area I have them in and thus giving it tea-stained rings.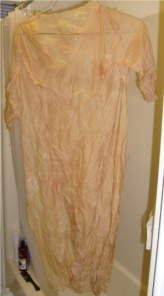
Once it had been stained to your liking you can take it out of the water and carefully take the tea-bags out of the dress and ring out any access water. After this is all said and done I emptied out the tub of water into the drain making sure that I didn’t get the tea everywhere and I also kept the tea-bags in the tube for later.
I then used the bathtub’s faucet to get rid of any left over peices of tea. This is important for later if you plan to use a dryer to dry your dress. Having peices of tea in your dryer can make it smell like tea or make clothes that you later dry in the dryer smell like tea.
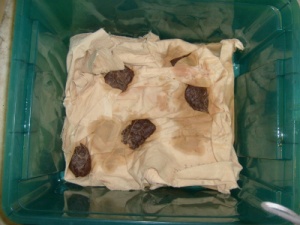 I then looked over the dress to see if there were parts I could make more ‘dirty.’ I also let it dry out just bit via hanging over the plastic tub I used to dry it in. Once I gave it some time to not be soping wet, I put the bottom of the dress a bit flat into the bottom of the mostly dry tube. I placed some of the tea bags in locations on the bottom of the dress that maybe weren’t dirty enough for my liking. I then folded the dress over that area and added more teabags to the next layer until the entire dress was folded nicely into the tub with every layer having some teabags on it. I then used some extremely warm water and poured it over the tea bag areas. Just for one more shot at making some teastain rings. I checked on this for two hours constantly adding a bit more hot water to the tea bags.
After doing all the teastaining I put the dress, rung out of as much water as possible, into the dry so that I could work with putting the cuffs, belt and collar onto some dry material.
Step Three: Adding Cuffs, Belt, Collar & Zipper
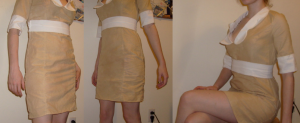 For this part of the tutorial I forgot to take pictures, so I am gonna try to be as descriptive as I can.
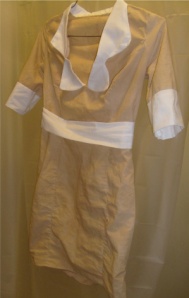 For the cuffs of the dress, I folded a retangular piece of fabric in half until I felt the cuff was as big as the game’s cuffs. I then measured it to the sleeve so that it fit THEN cut the retangler cuff before pinning it and such. I stitched in the ditch for the cuffs on the sleeves so that it would look like the cuffs were just a regular part of the dress and not sewn on.
For the belt I stitched one end to one side of the zipper and the other end to the other side of the zipper. This gave it a nice snug fit, however, it made it hard to get on and off. In the future I may make the belt stitch from underarm to underarm in the front and the back to make it easier to take on and off.
For the collar I used the patterns collar as a start and used some extra fabric I had sitting around to draw the original collar pattern to the mock pattern, then just eyeballing it a little I tried to draw on the extra parts to the collar I needed onto the scrap fabric. I then pinned on the scrap fabric collar onto the dress and looked at it to make sure it looked right before using the scrap fabric to make the real collar. With scrap fabric you can do this a few times to make sure its exactly how you like it. I’ve also used 1$ wrapping paper in the past. A trick taught to me by my friend Missy (Hi MISSY!)
The zipper I made on the side and used a invisible zipper tutorial. I put it on the side because it could be less visible there and because you can not normally see a zipper on most SH nurses or any buttons. (There is some people who think the Origin’s nurse has a zipper in the front). Using the zipper tutorial provided it gave me enough wiggle room in the dress to take it on and off but keep it tight to my figure.
**Something you cannot see in these pictures because I didn’t realize it until after I was done with the dress is that if you are making a Demon Nurse dress the front is long but the back is short and from the side it almost looks like an apron. Example Here. Because of this you can add this step in before you put in the zipper for accuracy.
Step Four: Finishing the Staining
With the dress finished up its time to finish the staining. For this I added only two or three tea bags to the plastic tub and followed similiar directions to the way I did the rest of the dress. Except I didn’t tye-dye bag the belts and collars and such. Instead of leaving it in for hours I also kept checking back on the added pieces until they were stained to my liking.
Step Five: Goring it to the Finish
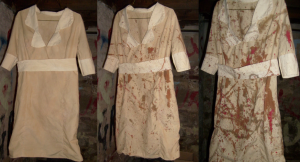 This is my favorite step because I love painting and I love gore! Pictured above is the layers I put into it from no paint to the final product.
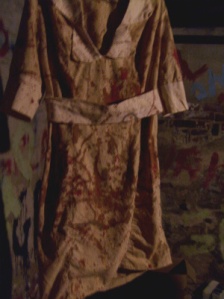 Using brown, red and black acrylic paint I made varying forms of dirt and old blood in small amounts at the bottom of plastic cups. I then added some water to the paint and stirred it until the paint was nice and watered down. Then, wearing clothing I didn’t care if it got dirty and picking a location that it was okay to get paint in and around, I used a paint brush to spatter paint all over it. Make sure to not make to many spatter lines or it can look fake. Use as many colors as possible and layer them on as you like. The more colors the less fake looking. After to let this dry a bit you should have no problem getting the dress dry cleaned in the future. I also want to point out that I used Gore Red (a miniatures paint color) for my more bloody areas, however, I tried not to use to much of it because nurses don’t have alot of red blood showing in game. I just did it for effect. The more you get just large area’s of paint droplets the more realistic to the game it looks. If you are looking to make it more like the art version, you can use the same procedure, I would just recommend using sponges in the watered down paint as well and putting in less layers.
The finished product should look awesome in darkened areas and in directional lighting. It will also look awesome in the day time. On REALLY close inspection, depending on how much time you put into the spattering, it should look pretty darn good. But depending on how thinly you spatter depends on how realistic it looks in the end.
Step Six: Shoes and Hat (Optional)
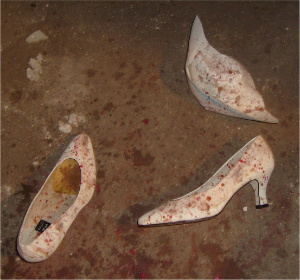
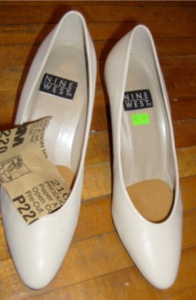 Every nurse costume needs a hat and some shoes. For the hat I went for accuracy, however, even I will admit that the shoes having heels is not accurate. I used shoes with heels so that my legs would look definded, which is hard to do to your own legs without flats. However, whatever shoes you decide to wear for your costume, you can use this technique.
For the shoes I sanded them down a bit so that the paint I later put on it would set better. I also chose a off white colored shoe because you can’t tea stain most shoes and most nurses shoes aren’t bright white either. After sanding them I put them under my dress when I paint spattered it so that the paint from the dress would randomly spatter on the shoes. I also spattered the shoes a bit. They were easier to do then the dress. XD
For the hat I used a very thick and heavily starched interfacing. I cut out this pattern from the interfacing and set it in some tea water I had left for a bit before leaving it out to dry. Once it had dried over night I used a light blue sharpie to make the line you can see in the demon nurse hat across the top. Then I sewed the hat all together to get it in the right shape. It can be pinned into the hair in the back if you use this pattern and stays in place really well with only two pins. I then put the hat with the shoes under the dress and spattered it a bit. I also added some smugged paint to the bottom rim of it for some shadowed effects.
Other Nurse Tutorials
Dress Tutorial on DeviantArt by Radical-Rain
Mask Tutorial on DeviantArt by Radical-Rain
Mask Tutorial on DeviantArt by DDRshaman38
Mask Tutorial on DeviantArt by MithriLady
Fabric/Pattern Tutorial on Youtube by Nostalg*a Cosplay
Fabric Dying Tutorial on Youtube by Nostalg*a Cosplay
If you have any questions or comments about this tutorial or purhaps another useful tutorial to add to this list, please do not hesitate to PM me on Cosplay.com


